Independence Day Crafts
Home and Garden Show 2020 Presentation
The following information is being presented to you as a virtual Home and Garden Show by the Lea County Extension Service. The Lea County Master Gardeners and the Lea County Family and Consumer Science Agent have put together several informative programs along with videos for you to enjoy!
This information on Independence Day Crafts is presented by Lea County Family and Consumer Science Agent, Robin Mack Haynes. The supply list for each project is listed below.
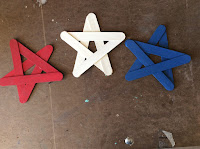
 Tongue Depressor Stars
Supplies:
Craft Paint (Red, White and Blue)
Tongue Depressors (5)
Glue
Clothes Pins
Paint Brushes
Directions:
Paint the tongue depressors red, white and blue. For 3 stars you will need 15 tongue depressors. Once painted, begin gluing the ends of the tongue depressors together in the order of the photos below. Make sure you intertwine the depressors while gluing so that they stay in one piece. To hold the tongue depressors in place while the glue dried, I used some clothes pins. It will be easier to glue these stars in stages, rather than try to glue the entire star as once.
Once the glue has set, touch up any glue or paint spots. Then add in your own embellishments (jute, ribbon, etc.). Hang the stars together or separate. . . . Your choice!
2x4 Fire Crackers
Supplies:
2 x 4's cut into 3 different lengths
Craft Paint (Red, White, Blue)
Wire or Jute Rope
Paint Brushes
Glue
Drill
Directions:
Cut the 2 x 4's to 3 different lengths. Mine were cut to 2-inches; 4-inches; and 6-inches. You can lightly sand the wood, or leave it rough, it is up to you. Begin painting each piece a different color. Once the wood is painted, add in your own embellishments or leave them plain. You could add in jute rope, paint on stars or bursts.
 Drill a small hole in the top of the 2 x 4. Make sure and drill the hole large enough to accommodate whatever you will be adding into the hole as the wick. I choose to use some wire. Before gluing the wire in place on the wood, I wrapped it around a pencil to get a curling effect. Add some glue into the drilled hole, then place your "wick" into the hole. Allow the glue to dry.
Scrap Wood Flag
Supplies:
1 x 6 piece of scrap wood
Craft Paint (Red, White, Blue)
Star Stencil
Masking Tape
Ruler
Directions:
Tape off the flag sections on the wood. I was able to tape off the top for the blue and the stripes for the red. I gave both sections two coats of paint. I then removed the tape on the bottom, and re-taped over the red, to paint the white stripes. Once finished painting, I added touch ups and used a stencil to trace a star onto the blue. Painting free hand, I painted the white star in place. It also took two coats of paint, so as not to see the blue through the star.
We hope you enjoy the "Fruits of our Labor". If you have Home or Garden Questions, or would like more information on Lea County Extension Programs please feel free to contact the Lea County Extension Service Staff at:
Agriculture Agent--Wayne Cox hwcox@nmsu.edu
Family & Consumer Science Agent--Robin Haynes rmack@nmsu.edu
4-H/Youth Development--Kayla Hinrichs kdawn07@nmsu.edu
4-H/Youth Development--Kayla Hinrichs kdawn07@nmsu.edu


