Saturday, June 6, 2020

Vegetable Scrap Garden
Home and Garden Show 2020 Presentation

The following information is being presented to you as a virtual Home and Garden Show by the Lea County Extension Service.  The Lea County Master Gardeners and the Lea County Family and Consumer Science Agent have put together several informative programs along with videos for you to enjoy! 

This information on Vegetable Scrap Gardens is presented by Lea County Master Gardener, Bonnie Saucedo.   Bonnie offers these tips for adding these "scraps" into you own garden.

Vegetable scrap gardens are a fun and exciting way to regrow items that were destined for the garbage bin. Here is just a small list of scraps you can regrow:

Green onions        Lemongrass                Leeks                     Fennel
Celery                   Cabbage                     Bok choy                Ginger
Carrots                  Beets                          Cilantro                   Parsley
Pineapple             Romaine                      Lettuce                   Purple onion 
Garlic

Below are steps you can take to regrow three of your own vegetable scraps:

Celery
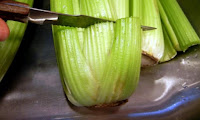
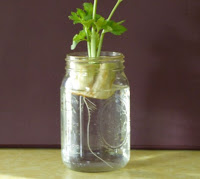
Cutting CeleryTo regrow celery, cut celery stalks about 2 inches off the root end of a bunch of celery. Place the bottom of the celery in a shallow glass bowl or jar. Fill with just enough water to submerge an inch of the root end, and place the bowl or jar in a place where it can get good sunlight for at least 4 hours a day. Change the water ever few days, and make sure the root end is always submerged. If necessary, you can use toothpicks around the side of the bowl to keep the celery root from touching the bottom of the bowl or jar.

Celery Cuttings in Jar
In a few days you will start to see small leaves emerging from the center of the celery root. In about a week small stalks and leaves will start emerging, and you will start to see the roots coming in around the base of the celery root.

When the roots are about an inch long, you can place the whole thing into potting soil or into your garden. Celery thrives in cool rich soil, so give it lots of shade and feed it with a fertilizer that is suitable for vegetables


Cilantro

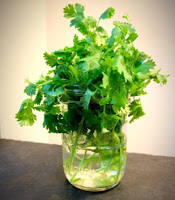
To regrow cilantro, talk a piece of cilantro, and cut at the base, leaving about 3 inches from the top. Remove all but the top leaves. Put your cutting into a glass jar, and place in a sunny location. In about 3 days, you will see tiny roots emerge. Once your roots are about an inch long, you can transfer them into potting mix or your garden. Cilantro grows best in cool soil. When temperatures increase, the plant will begin to bolt so plant in the early spring and late fall for best results.


Garlic
There are some amazing pictures of regrowing garlic from bulbs from the store. I tried the water bottle method, and had success. Here’s how to regrow garlic.

Cut the top portion of a water bottle off, leaving the plastic cylinder part. Fill the cut bottle with water. Drop the intact garlic bulb into the bottle. Just the bottom of the bulb should be submerged in the water, the rest should sit on ‘top’ of the bottle. Place the bottle in a location that will get indirect light – be sure to avoid direct sunlight. Maintain the water level and change out the water weekly. In two to three weeks you should see good root growth and lots of shoots. At this point, gently break apart the cloves and place them into potting soil or into your garden. Garlic is a cold weather plant, so plan to grow and plant them in October/November.

Green Onions
Green onions are so easy to grow. Cut the green onion about one inch from the bottom. Place your cuttings in a glass jar, and place in a sunny location. In about a week you will see inch long roots and green stalks coming from the top. Transfer the cuttings to a pot or directly into your garden. Here are my cuttings after a few weeks of being in the garden. 


We hope you enjoy the "Fruits of our Labor".  If you have Home or Garden Questions, or would like more information on Lea County Extension Programs please feel free to contact the Lea County Extension Service Staff at:


Agriculture Agent--Wayne Cox   hwcox@nmsu.edu
Family & Consumer Science Agent--Robin Haynes  rmack@nmsu.edu
4-H/Youth Development--Kayla Hinrichs kdawn07@nmsu.edu


How to Divide Irises
Home and Garden Show 2020 Presentation
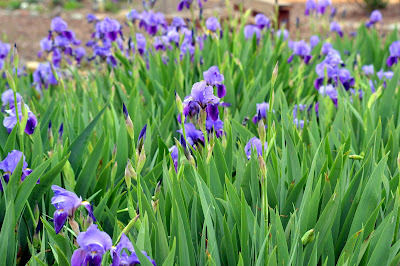
Field of Iris

This information on Dividing Irises is presented by Lea County Master Gardener, Kathleen Pryer.  Kathleen shares a video with us from former NMSU Specialist Curtis Smith on dividing Irises. 

Here are some additional tips from Kathleen on dividing your Irises:
  • Irises need to be divided every three to five years. When your Irises are not blooming profusely or there is an empty space in the middle of the clump where the oldest plants are.  They will not be hard to divide, as you can see in the video.
  • Divide your Irises 4 to 6 weeks after they finish blooming. You will need a spading fork or shovel, scissors, marker and hose or water. 
  • Label your Irises as you dig them up.  They are all alike, once you have dug them up.  label the fans of each clump with your permanent marker to prevent mix-ups. 
  • Trim the fans back to about 6-inches using scissors.  This will encourage good root growth when they are replanted. 
Kathleen also suggests the Historic Iris Preservation Society for additional information on Irises.  They have some great resources on their website at https://www.historiciris.org/iris-basics/


We hope you enjoy the "Fruits of our Labor".  If you have Home or Garden Questions, or would like more information on Lea County Extension Programs please feel free to contact the Lea County Extension Service Staff at:

Agriculture Agent--Wayne Cox   hwcox@nmsu.edu

Family & Consumer Science Agent--Robin Haynes  rmack@nmsu.edu

4-H/Youth Development--Kayla Hinrichs kdawn07@nmsu.edu

Plant Propagation
Home and Garden Show 2020 Presentation
Plant Propagation
The following information is being presented to you as a virtual Home and Garden Show by the Lea County Extension Service.  The Lea County Master Gardeners and the Lea County Family and Consumer Science Agent have put together several informative programs along with videos for you to enjoy! 

This information on Plant Propagation is presented by Lea County Master Gardener, Peggy Stevenson.  The video shown on NMSU Lea County CES Facebook page, details several ways to propagate different plants for your home garden.  Peggy suggests a book "Treasury of Gardening" as a great resource for any home gardener. Treasury of Gardening Book is published by Publications International, Ltd.  Written by Wayne Ambler, Carol Landa Christensen, Larry Hodgen, Peter Loewer and Ted Marsten, Copyright 1997.

Additional information on gardening and horticulture can be found on the website of the College of Agricultural, Consumer and Environmental Sciences.  The Cooperative Extension Service "How To" Publications are a great resource for any gardener.  https://aces.nmsu.edu/pubs/_h/ 

We hope you enjoy the "Fruits of our Labor".  If you have Home or Garden Questions, or would like more information on Lea County Extension Programs please feel free to contact the Lea County Extension Service Staff at:

Agriculture Agent--Wayne Cox   hwcox@nmsu.edu
Family & Consumer Science Agent--Robin Haynes  rmack@nmsu.edu
4-H/Youth Development--Kayla Hinrichs kdawn07@nmsu.edu
Unconventional Pots
Home and Garden Show 2020 Presentation
The following information is being presented to you as a virtual Home and Garden Show by the Lea County Extension Service.  The Lea County Master Gardeners and the Lea County Family and Consumer Science Agent have put together several informative programs along with videos for you to enjoy! 

This information on Unconventional Pots is presented by Lea County Master Gardener, Karen Henson.   Karen offers these tips for adding some Whimsy to YOUR own garden.


We hope you enjoy the "Fruits of our Labor".  If you have Home or Garden Questions, or would like more information on Lea County Extension Programs please feel free to contact the Lea County Extension Service Staff at:

Agriculture Agent--Wayne Cox   hwcox@nmsu.edu
Family & Consumer Science Agent--Robin Haynes  rmack@nmsu.edu
4-H/Youth Development--Kayla Hinrichs kdawn07@nmsu.edu
Independence Day Crafts
Home and Garden Show 2020 Presentation
The following information is being presented to you as a virtual Home and Garden Show by the Lea County Extension Service.  The Lea County Master Gardeners and the Lea County Family and Consumer Science Agent have put together several informative programs along with videos for you to enjoy! 

This information on Independence Day Crafts is presented by Lea County Family and Consumer Science Agent, Robin Mack Haynes.  The supply list for each project is listed below. 


Tongue Depressor StarsTongue Depressor Stars
Supplies:
Craft Paint (Red, White and Blue)
Tongue Depressors (5)
Glue
Clothes Pins
Paint Brushes

Directions: 
Paint the tongue depressors red, white and blue.  For 3 stars you will need 15 tongue depressors.  Once painted, begin gluing the ends of the tongue depressors together in the order of the photos below.  Make sure you intertwine the depressors while gluing so that they stay in one piece.  To hold the tongue depressors in place while the glue dried, I used some clothes pins.  It will be easier to glue these stars in stages, rather than try to glue the entire star as once.

Once the glue has set, touch up any glue or paint spots.  Then add in your own embellishments (jute, ribbon, etc.).  Hang the stars together or separate. . . . Your choice!
Star assembly diagram step 1
Star assembly diagram step 2


Star assembly diagram step 3


2x4 Fire Crackers
Supplies:
2 x 4's cut into 3 different lengths
Craft Paint (Red, White, Blue)
Wire or Jute Rope
Paint Brushes
Glue
Drill

Directions: 
Cut the 2 x 4's to 3 different lengths.  Mine were cut to 2-inches; 4-inches; and 6-inches.  You can lightly sand the wood, or leave it rough, it is up to you.  Begin painting each piece a different color.  Once the wood is painted, add in your own embellishments or leave them plain.  You could add in jute rope, paint on stars or bursts.

2 x 4 Fire Crackers and Wooden Star PhotoDrill a small hole in the top of the 2 x 4.  Make sure and drill the hole large enough to accommodate whatever  you will be adding into the hole as the wick.  I choose to use some wire.  Before gluing the wire in place on the wood, I wrapped it around a pencil to get a curling effect.  Add some glue into the drilled hole, then place your "wick" into the hole.  Allow the glue to dry.


Scrap Wood Flag
Supplies:
1 x 6 piece of scrap wood
Craft Paint (Red, White, Blue)
Star Stencil
Masking Tape
Ruler

Directions:
Tape off the flag sections on the wood.  I was able to tape off the top for the blue and the stripes for the red.  I gave both sections two coats of paint.  I then removed the tape on the bottom, and re-taped over the red, to paint the white stripes.  Once finished painting, I added touch ups and used a stencil to trace a star onto the blue.  Painting free hand, I painted the white star in place.  It also took two coats of paint, so as not to see the blue through the star.
 

We hope you enjoy the "Fruits of our Labor".  If you have Home or Garden Questions, or would like more information on Lea County Extension Programs please feel free to contact the Lea County Extension Service Staff at:

Agriculture Agent--Wayne Cox   hwcox@nmsu.edu
Family & Consumer Science Agent--Robin Haynes  rmack@nmsu.edu
4-H/Youth Development--Kayla Hinrichs kdawn07@nmsu.edu
Hydroponics
Home and Garden Show 2020 Presentation

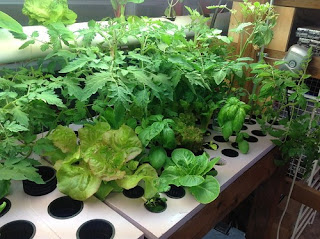
This information on Hydroponics is presented by Lea County Master Gardener, Sharla Kennedy.  Throughout the video, Sharla details the Advantages and Disadvantages of Hydroponic Systems; How to Construct a Hydroponic System; Seeds to Grow; Fertilizing the System and Alternative Hydroponic growing. 

Hydroponic Garden


Here are some additional tips  Sharla on Hydroponic Gardening:

Advantages:
  • You can grow anywhere
  • Uses 20 times less water than soil gardening
  • Your environment is sterile which means no pesticides
  • You'll use 20% less space for growing
  • The system water can be reused, allowing you to conserve water
  • Harvesting is easier
  • No mulching, tilling, changing of soil and weeding.
  • You can grow year round if indoors if in a controlled environment
Disadvantages:
  • Putting together a hydroponic system isn't cheap
  • Constant monitoring is required
  • Hydroponic Systems are vulnerable to power outages
  • Growing a hydroponic garden demands technical expertise
  • Production is limited compared to field conditions
  • If a disease appears, all plants in the system will be affected
  • Without soil to serve as a buffer, if the system fails plant death will occur rapidly 
Materials for Hydroponic Gardening:
PVC Pipe
Stand and Trellis made of PVC pipe
Plant Clips
20-50 Gallon Nutrient Tank
Plastic Tubing
Expanded Clay Pebbles
Water
pH Testing Kit with Buffer Solutions
Planting Cups
Fertilizer for a Hydroponic System
Pump
Plant Light
Timer Plants or Seeds
Rock Wool
Twine

Nutrients and pH Balance:
Fill the 20-50 gallon tank with water.  Then add the nutrient to the tank as recommended by the fertilizer label, turn on the pump and let the system run for about 30 minutes to get all the nutrients thoroughly mixed.  Sharla recommends Master Blend 4-18-38; Calcium Nitrate and Magnesium Sulfate (Epsom Salt).

To Dissolve the nutrients use these steps:
  1. First dissolve .6 grams of Master Blend per gallon, in a small cup with a small amount of water, add water to the gallon jug.
  2. Second dissolve .4 grams Epsom Salt per gallon, in a small cup with a small amount of water, then add to water and Master Blend.
  3. Third dissolve .4 grams Calcium Nitrate per gallon, in a small up with small amount of water, then add to water with Master Blend and Epsom Salt.
  4. Once mixed check the pH level and adjust levels with pH buffer solutions. 
**Note:  .5 grams = 1/2 Teaspoon

Club Sandwich Salad Recipe:
Salad Ingredients:
8 cups lettuce (Torn/Chopped/Greens/Micro Greens)
1 tomato, chopped
3 ounces sliced ham
3 ounces sliced turkey
2-4 ounces cheese, cubed or grated
1/4 cup cooked bacon, crumbled
4 slices white bread, lightly toasted, cubed

Dressing Ingredients:
1 drop liquid smoke
1/4 teaspoon garlic granules
1/4 teaspoon salt
1/4 teaspoon ground black pepper
1/2 cup mayonnaise
1/4 cup sour cream
1/4 cup crumbled cooked bacon
1/4 cup milk

Directions:
Divide the lettuce between two dinner plates.  Top with chopped tomatoes, sliced turkey and ham, cheese and crumbled bacon.  Add cubed bread on the top. 

To make the dressing--add the seasonings and milk into a jar and shake to combine.  Then add in the mayonnaise and sour cream, then shake again.  Add in the bacon and shake until completely mixed.  Chill until ready to use or overnight. 


We hope you enjoy the "Fruits of our Labor".  If you have Home or Garden Questions, or would like more information on Lea County Extension Programs please feel free to contact the Lea County Extension Service Staff at:

Agriculture Agent--Wayne Cox   hwcox@nmsu.edu
Family & Consumer Science Agent--Robin Haynes  rmack@nmsu.edu

4-H/Youth Development--Kayla Hinrichs kdawn07@nmsu.edu

Sewing New Cushions for Your Outdoor Furniture
Home and Garden Show 2020 Presentation
Finished Seat CushionThe following information is being presented to you as a virtual Home and Garden Show by the Lea County Extension Service.  The Lea County Master Gardeners and the Lea County Family and Consumer Science Agent have put together several informative programs along with videos for you to enjoy! 

This information on Making New Cushions for your Outdoor Furniture is presented by Lea County Family and Consumer Science Agent, Robin Mack Haynes.  The supply list for the project is listed below. 

Supply List for Cushions:
Outdoor Fabric
Foam
Thread
Zipper
Sewing Equipment (Sewing Machine, Scissors, Marking Pen, pins, etc.)

Directions:
Measuring the Seat of the Chair
Measuring the Seat 
Measure the seat you will be making the cushion for.  Measure the length and the width.  Then purchase a foam cushion that will fit this space.  There are many versions of these cushions to select from.
Once you have the foam, construct a cover for that foam, using the length, width and thickness as a guide.  The fabric you cut out will need to have seam allowances added into the measurements BEFORE the fabric is cut out.  I added 1-inch to each of the measurements for a 1/2" seam allowance.

Example:  Foam length--17" x  width--15" x thickness--2"
                 Fabric cut out was length--18" x width--16 x thickness--3"


Sewing the Zipper
Sewing the Zipper
When choosing a zipper, chose a length that is 1-inch shorter than the side you will be putting it one.  For example:  my zipper was going the on the side that measured 17-inches.  Therefore, I purchased a 16-inch zipper for the project. Once the fabric is cut, stitch the zipper side first.  Fold and press in the inside seam 1/4".  Place the fold next to the zipper teeth, stitching close to the fold.  Do this on both sides.  Measure from the head of the zipper to the end of the fabric(length) and across the fabric (width).  Double the length measurement, cutting out two squares for each end of the zipper. Fold and press the fabric in half, then place the folded edge next to the metal zipper stop and the head of the closed zipper.  Top stitch the zipper stop in place.  Leave the other three edges loose, as they will be stitched in place with the side seams.
Sewing the Zipper Stop

Mark each end of the side strips at the seam allowance.  My seam allowance was 1/2", so I drew a line across the short side of each strip.  Begin with the zipper and opposite side first.  Pin the fabric onto the seat fabric, stitching from line to line.  Remember to back stitch, but do not stitch past the line, Next stitch the other two sides in place, stitching from line to line.

Start the process again, stitching the other seat piece to the sides.  Just like the first seat, start with the zipper side and move to the others.  Once your sides are completed, you should have openings at the corners.  Match the lines at each corner, pin and stitch from edge to edge.  Be careful to only stitch the side pieces, moving the seat corners out of the way of the stitches.

Sewing the Corners
Sewing the Corners
Once finished stitching the corners, turn the cushion cover right side out, and add the foam into the cushion.  If your measurements were correct, the cushion should fit tightly around the piece of foam.
Work the foam into the corners, and work the fabric up the foam until covered.  Zip up the cover, and your finished.

The photos below will give you a close up view of the sewing project.  

We hope you enjoy the "Fruits of our Labor".  If you have Home or Garden Questions, or would like more information on Lea County Extension Programs please feel free to contact the Lea County Extension Service Staff at:

Agriculture Agent--Wayne Cox   hwcox@nmsu.edu
Family & Consumer Science Agent--Robin Haynes  rmack@nmsu.ed
4-H/Youth Development--Kayla Hinrichs kdawn07@nmsu.edu
Gardening with Herbs
Home and Garden Show 2020 Presentation

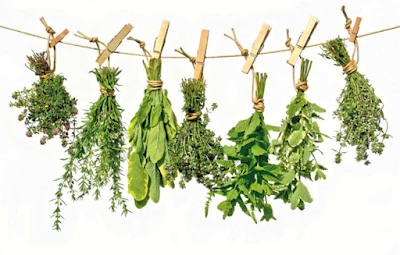
Hanging Herbs

The following information is being presented to you as a virtual Home and Garden Show by the Lea County Extension Service.  The Lea County Master Gardeners and the Lea County Family and Consumer Science Agent have put together several informative programs along with videos for you to enjoy! 

This information on Gardening with Herbs is presented by Lea County Master Gardener, Barbara Dunford.  Throughout the video, Barbara shows you the common herbs found in many household gardens.  These herbs include Rosemary, Mint, Thyme and Basil. 


VIDEO

Barbara suggests this handout from the Home Depot Garden Club.  Here is the website to some of their suggestions for your new Herb Garden.
http://gardenclub.homedepot.com/how-use-herb-garden-every-day/

To enjoy your herbs daily, try including some herbs infused into water.  Below the recipe for the flavored waters, made during the video.

Citrus Wedges (Lemon, Lime or Orange)
Cucumbers (cut into sliced and unseeded)
Mint Leaves (3 to 4 whole leaves)
Ice
Sweetener

Add ingredients into a glass, shake well and enjoy.

We hope you enjoy the "Fruits of our Labor".  If you have Home or Garden Questions, or would like more information on Lea County Extension Programs please feel free to contact the Lea County Extension Service Staff at:

Agriculture Agent--Wayne Cox   hwcox@nmsu.edu
Family & Consumer Science Agent--Robin Haynes  rmack@nmsu.edu

4-H/Youth Development--Kayla Hinrichs kdawn07@nmsu.edu
Summertime Recipes
Home and Garden Show 2020 Presentation

The following information is being presented to you as a virtual Home and Garden Show by the Lea County Extension Service.  The Lea County Master Gardeners and the Lea County Family and Consumer Science Agent have put together several informative programs along with videos for you to enjoy! 


Summer Time Drinks
Sparkling Mint Lemonade
Ingredients: 
1 cup fresh Mint Leaves
1 cup Simple Syrup
1 cup Lemon Juice, freshly-squeezed
6 cups cold Water 2 cups Sparkling Water
 
Directions:
Mint LemonadeSlice lemon for garnish In a pitcher, add the fresh mint leaves and simple syrup. Gently muddle the leaves with a wooden spoon, being careful not to tear them. Stir in the lemon juice and cold water. Just before serving, add the ice and sparking water. Garnish with sliced lemon. Serves 10-12.

The Simple Syrup is made using the following directions--In a medium saucepan, combine 1 cup white sugar and 1 cup water. Stir over medium heat until the sugar dissolves. Increase the heat and bring to a boil. Reduce the heat to medium and simmer for about three minutes. Chill thoroughly before using.

Raspberry Strawberry Margaritas
Ingredients:
1 ½ pints Strawberries
½ pint Raspberries
2/3 cup Sugar
½ cup freshly squeezed Lime Juice
1 ½ cups Tequila Silver
2/3 cup Orange Liqueur
Ice
Assorted Berries for garnish
Mint leaves for garnish
Lime wedge for garnish

Directions:
Blend strawberries and raspberries together in a blender with tequila, orange liqueur, lime juice and ice.  Once blended, use a lime wedge to coat the top edge of the glass, then dip the glass in a ring of salt or sugar.  Pour margarita mixture into the glass, and top with assorted berries, mint leaves and a lime wedge on the edge of the glass.  Makes 6 servings. 
Summer Time Desserts
Angel Food Cake with Berries
Ingredients
1 Angel Food Cake
16 oz Whipped Topping, thawed
1 container Marshmallow Crème (7 oz)
2 teaspoons Almond Extract
1 pint each of Strawberries, Blueberries, Red Raspberries, Blackberries
Mint (optional)

Directions: 
Clean and cut the fruit, place in bowl.  Using a hand mixer, whip together ½ of the whipped topping with the marshmallow crème until smooth, once mixed, fold in additional whipped topping.  Add almond extract. 

Divide the Angel cake into thirds.  Begin layering the cake, then the whipped topping mixture, then the berries.  Repeat until finished with berries on top.  Garnish with fresh mint. Refrigerate until serving or serve immediately. 

This recipe is from the following website:  https://hoosierhomemade.com/angel-food-cake-with-berries/

Berry Dessert Pizza
Ingredients
1 package refrigerated Sugar Cookie Dough
1 package Cream Cheese, softened
Fruit Pizza2 cups heavy Cream
1 cup Powdered Sugar
2 teaspoons Lemon Zest
1 cup Strawberries, sliced
1 cup Blueberries

Directions:
Preheat the oven to 350°F. Form the cookie dough into a large ball, then roll out into a flat circle on a pizza pan. It will expand, so make the crust slightly smaller in diameter than your pizza pan. Bake for 12-15 minutes or until the crust turns slightly golden.

Whip the cream cheese for 2-3 minutes on high until it is smooth. In a separate bowl, whip the heavy cream until it becomes stiff and peaks form. Fold the whipped cream into the cream cheese and add in the powdered sugar and lemon zest. Mix well until it's smooth and creamy. Cover and let chill in the refrigerator.

Remove the cookie crust from the oven and let it cool for 15 minutes. You can place it in the refrigerator so it chills more quickly. Once cool, spread the cream cheese mixture over the entire crust. Decorate the pizza with circles of alternating strawberries and blueberries, or your favorite fruits. Serve immediately.

This recipe is from The Crafted Sparrow https://www.thecraftedsparrow.com/

Summer Time Grilling

Grilled Summer Vegetable Pasta Primavera
Ingredients:
3 small Zucchinis thinly sliced
2 cloves Garlic minced
2 tablespoons Olive Oil
Salt and Pepper to taste
4 ears Corn, husked and silk removed
1 lb cooked Penne Pasta
1 cup fresh halved Cherry Tomatoes
2 tablespoons minced fresh Basil
3/4 cup grated Parmesan Cheese

Directions:
Boil Pasta according to package directions.  In a small bowl, toss zucchini with garlic, oil, and add salt and pepper to taste. Grill zucchini and corn over medium-high heat.  Cook until tender and slightly charred. Remove from heat. Remove corn from cob and toss with squash mixture. Toss grilled mixture into hot cooked penne pasta and add tomatoes, basil, and Parmesan cheese. Season pasta with salt and pepper to taste and serve hot. Makes 6 servings

Beef Pinwheels Beef Pinwheels
Ingredients
3 Steaks (beef, pork, venison, etc)
3 Roasted Bell Peppers
2 cups fresh Baby Spinach Leaves
1 cup shaved Parmesan Cheese
Salt and Pepper to taste
1 tsp finely chopped fresh Thyme

Pinwheels
Directions:
Using a food mallet, pound the steaks until they are thin enough to add vegetables and roll up.  For ease, lay the steak between two pieces of plastic film to pound the steaks, it will cut down on the mess.  Once the steaks are pounded thin, sprinkle the meat with the salt, pepper and thyme and then arrange the bell peppers over the meat in a single layer. Top with the baby spinach leaves and finally, sprinkle with the shaved parmesan.

Starting at one of the shorter ends, start rolling the meat, as tightly as you can, wrapping the filling within the meat. Wrap the roll tightly and secure with a toothpick or cooking twine.  Cook the pinwheels until the meat is at your desired taste. This recipe is great cooked out on the grill, on the stove top or in the oven. Makes 8 pinwheels. 


We hope you enjoy the "Fruits of our Labor".  If you have Home or Garden Questions, or would like more information on Lea County Extension Programs please feel free to contact the Lea County Extension Service Staff at:

Agriculture Agent--Wayne Cox   hwcox@nmsu.edu
Family & Consumer Science Agent--Robin Haynes  rmack@nmsu.edu
4-H/Youth Development--Kayla Hinrichs kdawn07@nmsu.edu